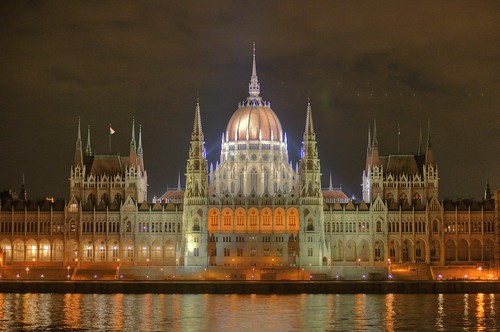
In photography, taking several different exposures of the same scene, each with slightly different settings is called bracketing. in the days of film, photographers often used bracketing when they weren’t certain of the correct exposure or aperture. By bracketing (capturing a few photos with settings in each direction below and above the current settings), a photographer could increase the chances that at least one photo would have the desired exposure, depth-of-field, or whatever else he was looking for. Bracketing is also a useful tool in teaching the art of photography: having several photos of the same scene taken with different apertures, say, helps one to understand the effect the aperture has on the final photograph.
Nowadays, the bracketing feature built into many cameras can be used for some cool new techniques that were not possible a few years ago. With the help of software, it is now possible to combine multiple photographs into a single photo that contains more information than any one of the original images.
Two techniques that fit this description are focus stacking and high dynamic range imaging. Focus stacking involves combining several photos taken with different focal points into one photograph that has a greater depth-of-field than any of its constituent photos. The advantage of this is that the aperture can be left relatively wide. This lets the photographer shoot with shorter shutter times and reduces refraction artifacts often introduced by tiny apertures.
I haven’t yet tried focus stacking. But today I made my first attempt at high dynamic range imaging. The result is the image above.
While in Budapest on business last month, I took a bunch of photos. I haven’t had time to go through most of them yet, but this morning I took a moment to take a look at some of the photos I took of the Hungarian Parliament building across the river from my hotel. I set the camera to take a decent middle-of-the-road exposure. Normally, this photograph would have been quite okay; but it would not have been perfect. The problem with this kind of scene is the big difference in brightness between the darkest and the brightest parts of the image. A photo that properly exposes the brightly illuminated dome would be far too dark to reveal the details of the building’s wings; and a photo with a long enough exposure to capture these details would be blown out in the bright parts.
So I took five of different exposures of the same scene, each with a slightly different shutter speeds: [-2, -1, 0, +1, +2]. I rested the camera on a flat railing and started the exposures using a timer, to ensure that the five photos were of exactly the same scene. The software essentially combined the best-exposed portions of each of the images, resulting in a single image that appears perfectly exposed across the dynamic range. Obviously, the full range of luminosities of the original scene is not represented exactly the same in this image. The original colors have been reassigned to a different palette displayable on standard computer displays, using a technique called tone mapping.
I'm pleased with the result and plan to take more similar photos soon.


1 comment:
Nice shot(s) Michael!
This is interesting, I've never tried bracketing this way myself, although doing some exposures above and some under the meassured exposure is always a good way to assure that at least one of them gets ok, when you have time and are in doubt of the exposure. I think you did really good with this one, it looks "professional" if you know what I mean. Would you say it makes justice to reality in terms of color, tone and such things and if not in what way would you say it differs? What software did you use?
Post a Comment